
30+ Spring Door Decorations Ideas for Your Classroom: Creative Ways to Celebrate Spring
Introduction to 30+ Spring Door Decorations Ideas for Your Classroom: Creative Ways to Celebrate Spring
As winter’s chill finally thaws and the first green buds appear, there’s an undeniable urge to bring that sense of renewal indoors. For educators, the classroom door presents the perfect canvas to welcome students into a vibrant, inspiring environment. Creative spring door decorations do more than just beautify a hallway; they set a tone of joy, curiosity, and growth for everyone who enters. Transforming your classroom entrance with seasonal flair is a powerful way to celebrate the changing seasons and engage young minds from the moment they arrive. This guide is packed with over 30 imaginative ideas to help you craft a stunning springtime display. Whether you’re drawn to blooming 3D flowers, whimsical animal themes, or interactive elements that encourage student participation, you’ll find inspiration to match your style and budget. Ultimately, a thoughtfully decorated door fosters a warm, welcoming atmosphere that enhances the entire learning experience, making your classroom a true springtime sanctuary.
Why Choose Spring Door Decorations for Your Classroom Space
Investing time in creating seasonal classroom door decor offers a multitude of benefits that extend far beyond mere aesthetics. Firstly, it creates an immediate emotional impact. A bright, cheerful door display acts as a visual greeting, signaling to students that this is a space of positivity and creativity. This is especially powerful after a long break or on a dreary morning, instantly lifting spirits and building anticipation for the day ahead. Furthermore, a well-executed door theme can seamlessly integrate with your curriculum. A decoration centered around the life cycle of a butterfly, a garden of math facts, or a literary-themed “book bloom” garden reinforces learning concepts in a playful, memorable way.
Moreover, these projects champion functionality through community and involvement. By involving students in the creation process—whether by having them paint paper petals, write their goals on raindrops, or add their names to buzzing bees—you foster a sense of ownership and pride in their classroom environment. This collaborative art project builds classroom community and allows every child to contribute. Finally, from a purely design perspective, a seasonal door refresh prevents visual stagnation. It keeps the learning environment dynamic and responsive to the world outside, mirroring the cyclical nature of the school year and the seasons themselves. It’s a simple, high-impact strategy to make your educational space feel curated, cared for, and full of life.
Key Elements & Design Components
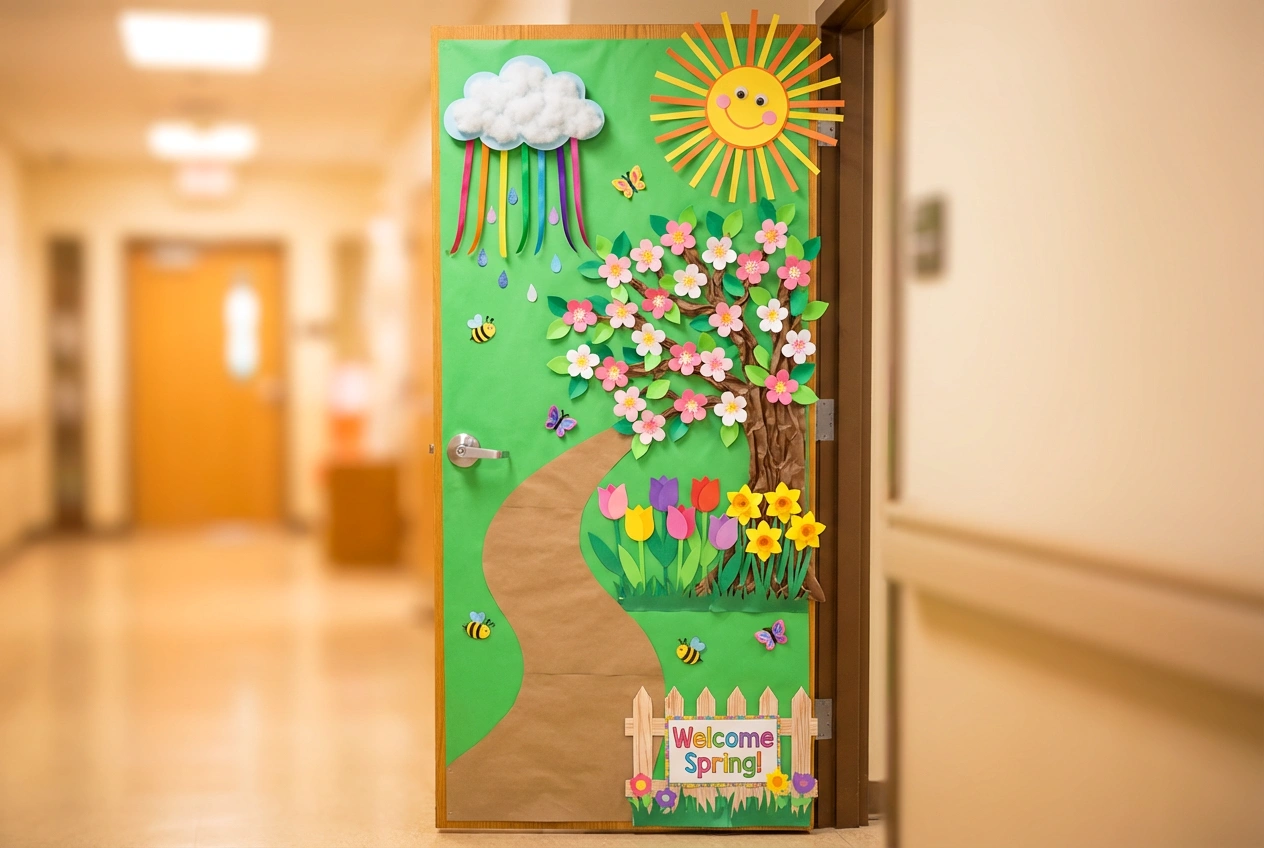
Essential Decor Items for Spring Classroom Door Designs
To bring your spring door idea to life, you’ll need a foundation of versatile craft supplies and a keen eye for thematic elements. First and foremost, consider your backdrop. A solid-colored bulletin board paper or a large sheet of fadeless paper in sky blue, grass green, or soft yellow provides a clean canvas. Essential crafting items include:
* Paper & Cardstock: The backbone of most decorations. Stock up on various shades of green for stems and leaves, and every hue of the rainbow for flowers.
* 3D Elements: To add depth and interest, incorporate items like tissue paper pom-poms for flower centers, accordion-folded paper for butterflies, and cotton balls for fluffy clouds or sheep.
* Letters & Typography: Pre-cut letters or a reliable method for creating your own (using stencils or a Cricut machine) are crucial for clear, catchy titles like “Spring into Learning!” or “Our Class is in Full Bloom.”
* Thematic Accents: This is where your theme shines. Think paper ladybugs, bumblebees, rainbows, umbrellas, kites, or baby birds. Recycled materials like egg cartons for flowers or paper plates for suns are excellent budget-friendly options.
* Student Involvement Components: Plan elements that students can personalize, such as pre-cut flowers, butterflies, or leaves where they can write their names or a spring wish.
Style Variations & Budget-Friendly Alternatives
Your spring classroom door can take on many personalities. For a Garden Paradise theme, go lush with layered paper flowers and creeping vines. A Rainy Day Adventure theme might feature a large umbrella with student-made rain boots dangling below. An Insects & Pollinators theme could be both educational and adorable, buzzing with bees and fluttering butterflies.
For those on a tight budget, creativity is your greatest asset. Instead of buying new paper, use painted newspaper or pages from old books for a rustic look. Repurpose cardboard boxes into 3D flowers or tree trunks. Utilize natural finds like real twigs for flower stems or a small branch as a mini tree. Dollar stores are treasure troves for inexpensive baskets, plastic bugs, and ribbon. Remember, the most memorable door decorations for spring often come from inventive, hands-on creation rather than expensive store-bought kits.
How to Achieve the Look: Step-by-Step Styling Guide
Crafting the perfect spring door decoration is a rewarding process. Follow these steps to ensure a polished and joyful result.
Step 1: Theme and Vision Development
Begin by choosing a central theme that excites you and your students. Will it be a “Catch the Reading Bug” garden, a “We’re Blooming with Kindness” flower patch, or a “Some Bunny Loves Our Class” scene? Sketch a simple layout on paper, deciding where your major elements (title, main imagery, student contributions) will go. This planning prevents overcrowding and ensures a balanced composition.
Step 2: Backdrop Creation and Preparation
Prepare your door or bulletin board. Secure your background paper smoothly, ensuring there are no wrinkles or bubbles. If your theme requires a split background (like blue sky on top and green grass on bottom), apply those layers first. This foundational step creates a professional base for all other elements.
Step 3: Crafting Central Focal Points
Construct the main attractions of your display. For instance, if you’re making a large sun, build it now. If your theme centers on a giant watering can “sprinkling” student flowers, create that key piece. These large items anchor the design and establish the visual hierarchy of your spring door decor.
Step 4: Adding Student-Created Elements
This is the heart of the project. Distribute pre-cut shapes (flowers, butterflies, leaves, raindrops) to each student to decorate and personalize with their name. This not only saves you time but guarantees each child feels represented. Assemble these pieces on a separate table before adding them to the door.
Step 5: Assembly and Layering
Start adhering your elements to the door, working from the background to the foreground. Attach stems and leaves first, then layer flowers on top. Add your central focal point next. Finally, place the student creations, ensuring they are evenly distributed. Don’t forget the title letters—they should be prominent and easy to read from a distance.
Step 6: Incorporating Finishing 3D Details
To elevate your design from good to great, add dimensional details. Use foam adhesive dots to make some butterflies “fly” off the door. Dangle elements like paper rain or kites from ribbon. Add googly eyes to critters for charm. These small touches create depth and whimsy, making your spring door decorations truly captivating.
Elevating the Look: Advanced Styling Tips
To make your classroom door design truly stand out, consider these pro-level tips. First, play with texture by mixing materials. Combine smooth cardstock with crinkled tissue paper, fluffy cotton, or even burlap for a rustic touch. Secondly, think about interactive elements. Create a door where a bee moves along a path to different flowers each week, or add a pocket with “spring facts” that students can pull out. Lighting can be magical; carefully placed string lights (battery-operated for safety) can make a moon and stars night scene or a firefly jar glow softly.
Furthermore, extend the theme beyond the door. Frame the doorway with a garland of leaves or flowers. Place a matching small decoration on the adjacent wall or on the classroom welcome table. This creates a cohesive “entrance experience.” Finally, don’t shy away from humor or puns in your title—they are memorable and bring an instant smile. A door that tells a mini-story or invites interaction will be the talk of the hallway.
Maintenance & Care: Keeping Your Spring Display Fresh
A well-made spring door display can last the entire season with a little care. Since doors are high-traffic areas, secure all elements firmly with strong tape or staples to prevent pieces from falling. If a piece does become loose or damaged, have a small “repair kit” on hand with extra tape and a spare decoration or two. For decorations that will be stored and reused, construct them with durability in mind. Laminating student name tags or using thicker cardstock can make them last for years. When the season ends, carefully remove decorations. Flatten and store large pieces in a portfolio or between sheets of cardboard, and keep smaller items sorted in labeled ziplock bags. This makes setting up your spring classroom decorations even easier next year.
FAQs: Frequently Asked Questions About Spring Door Decorations
Q: How can I make my spring door decorations inclusive for all students?
A: Ensure every child is represented. Have a designated element (a flower, a butterfly, a kite) for each student to personalize with their name. Avoid themes that might exclude; a general “Spring Garden” theme is more inclusive than one focused on a specific holiday.
Q: I’m not artistically inclined. Are there simple ideas for me?
A: Absolutely! A simple but stunning door can be made with a large tree branch attached to the door. Have students create colorful tissue paper blossoms to tape on. Or, create a “Rainbow of Kindness” with arched paper strips, each strip holding a student’s name. Clean lines and bright colors are very effective.
Q: What are some fire-safe and school-compliant materials to use?
A: Always check your school’s policy. Generally, paper, cardstock, and fabric are safe. Avoid excessive loose fluff or hay. Use battery-operated lights instead of plug-in ones. Ensure decorations do not obstruct the door window or impede the door’s function as a fire exit.
Q: How can I involve my students in the process without chaos?
A: Organize it as a structured center activity. Over a week, have small groups rotate through a decoration station during free time or art time. Pre-cut all materials and have clear examples. This manages the flow and makes the creation part of your routine.
Q: My door is metal and things won’t stick. What should I use?
A: Magnetic tape is a teacher’s best friend for metal doors. You can attach strips to the back of your decorations. Alternatively, use hot glue to attach small magnets to your pieces. For a non-permanent hold, try reusable adhesive putty, though it may not hold heavier 3D items.