
Mobile Home Kitchen Ideas: Bright Lighting for a Stylish Trailer Kitchen Remodel Single Wide
Introduction to Mobile Home Kitchen Ideas: Bright Lighting for a Styiler Trailer Kitchen Remodel Single Wide
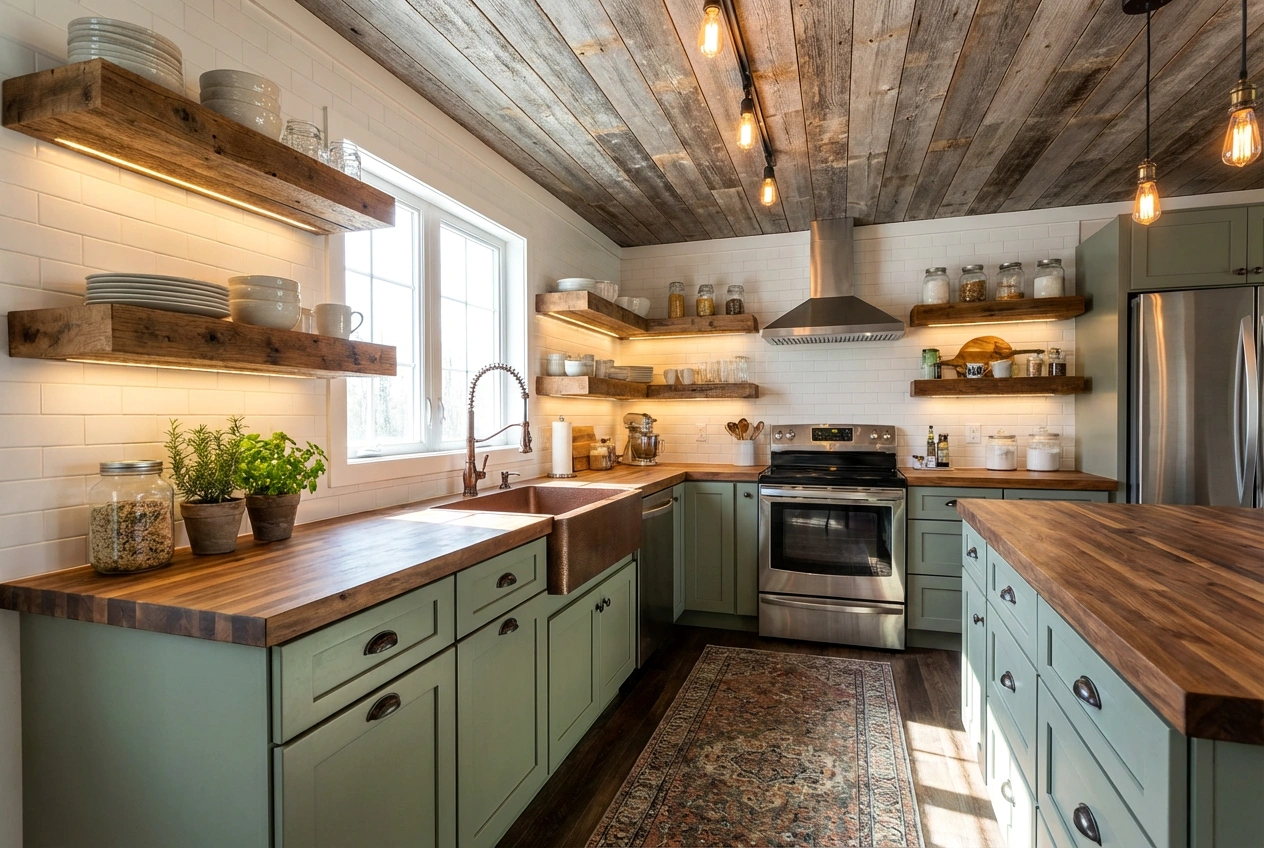
Imagine stepping into a kitchen that feels not just like a functional space, but a radiant, inviting heart of your home. This is the transformative power of a well-executed trailer kitchen remodel single wide. For many, the kitchen in a mobile home can feel confined or dated, but with strategic design, it can become a stunning showcase of style and efficiency. The secret weapon? Bright, thoughtful lighting. This approach goes beyond simply adding a fixture; it’s about creating a layered, luminous environment that visually expands the space, highlights beautiful design elements, and makes every task a joy. A single-wide mobile home kitchen remodel focused on illumination can dramatically alter the atmosphere, turning tight corners into cozy nooks and dark countertops into gleaming workspaces. Ultimately, this guide will inspire you to see your compact kitchen not for its limitations, but for its incredible potential to become a bright, stylish, and profoundly personal space.
Why Choose Bright Lighting for Your Single-Wide Kitchen Remodel?
Opting for a luminous design in your mobile home kitchen renovation is a decision that pays dividends in aesthetics, function, and emotion. First and foremost, bright lighting is the ultimate tool for spatial illusion. In a compact single-wide trailer kitchen, strategic lighting can make walls recede, ceilings feel higher, and the entire area appear more open and airy. This is crucial for combating any sense of claustrophobia and creating a welcoming flow. From a practical standpoint, a well-lit kitchen is a safer, more efficient workspace. Proper task lighting over sinks, stoves, and prep areas reduces eye strain and minimizes accidents, transforming cooking from a chore into a pleasure.
Furthermore, lighting is the jewelry of interior design—it adds sparkle, depth, and character. A layered lighting plan allows you to set the mood: bright and energetic for morning routines, soft and warm for intimate dinners. This emotional impact cannot be overstated; a bright, cheerful kitchen naturally becomes the gathering spot for family and friends. For anyone undertaking a manufactured home kitchen update, investing in lighting is investing in the daily quality of life. It’s a design choice that enhances every other element in the room, from your cabinet color to your backsplash tile, ensuring your stylish trailer kitchen remodel single wide feels both beautiful and brilliantly functional.
Key Elements & Design Components
Essential Decor Items for a Bright Single-Wide Kitchen
To achieve a luminous and stylish kitchen in your single-wide mobile home, you’ll need to curate a mix of essential lighting elements, reflective surfaces, and a cohesive color palette.
-
Layered Lighting Fixtures: This is the cornerstone. Your plan should include:
- Ambient/General Lighting: Recessed LED can lights or a central flush-mount ceiling fixture to provide overall illumination. Opt for high-CRI (Color Rendering Index) LEDs for truer color.
- Task Lighting: Under-cabinet LED strips or puck lights are non-negotiable for countertop workspaces. Pendant lights over a peninsula or island also serve as excellent task and accent lighting.
- Accent Lighting: Interior cabinet lighting (for glass-front cabinets), toe-kick lighting, or a small, stylish lamp on a counter can add warmth and dimension.
-
Reflective Surfaces: Use these to bounce and amplify light.
- Backsplash: A glossy subway tile, mirrored tile, or high-gloss paint.
- Countertops: Quartz or laminate with subtle sparkle or a light, solid color.
- Hardware: Polished chrome, nickel, or brass cabinet pulls and faucets.
- Floors: Light-colored laminate, LVT, or polished concrete.
-
Color Palette: Stick to a light and airy foundation. Whites, soft grays, pale blues, and creamy off-whites on walls and cabinets make the space feel larger. You can then add personality with color in accessories, a rug, or a vibrant appliance.
-
Strategic Decor: A well-placed, large mirror on a wall opposite a window doubles natural light. Sheer or light-filtering window treatments maximize daylight. Finally, choose a few statement decor pieces—a ceramic vase, a piece of art, a colorful kettle—that pop against the bright backdrop.
Style Variations & Budget-Friendly Alternatives
Your bright trailer kitchen makeover can adapt to any style, from modern farmhouse to sleek minimalist. For a rustic feel, use woven rattan pendant lights and open shelving. For a modern look, choose geometric sconces and handle-less cabinets. The principle of layered light remains constant.
On a budget? There are countless savvy swaps. Instead of all-new cabinets, paint your existing ones in a bright, semi-gloss white. Use peel-and-stick vinyl tiles for a temporary, glossy backsplash. Swap out a dark fixture for an affordable but stylish plug-in pendant lamp (using a cord cover kit for a clean look). Adhesive LED light strips under cabinets are inexpensive and incredibly effective. Remember, even small changes like changing the bulbs in your existing fixtures to brighter, warmer LEDs can have a massive impact without a major single-wide kitchen overhaul.
How to Achieve the Look: Step-by-Step Styling Guide
Step 1: Assess and Plan Your Lighting Layers
Begin by evaluating your current kitchen’s light sources. Map out where you need general, task, and accent lighting. For a single-wide trailer kitchen, prioritize task lighting on all countertops and ambient lighting that evenly fills the center of the room. Sketch a simple layout, noting where you have electrical access and where you might use plug-in or battery-operated solutions. This plan is your roadmap for a successful mobile home kitchen renovation.
Step 2: Establish Your Light-Reflecting Color Palette
Choose your primary wall and cabinet colors. For maximum brightness, select whites or very light neutrals with warm or cool undertones to match your desired vibe. Paint samples on large boards and observe them at different times of day. This light base will serve as a canvas, making your space feel larger and ensuring your lighting has a clean surface to reflect off of.
Step 3: Install Ambient and Task Lighting
Tackle the electrical work first. Install recessed can lights or a new bright ceiling fixture for ambient light. Next, focus on task lighting. Installing under-cabinet LED strips is one of the most transformative steps in a trailer kitchen remodel single wide. If you have a dining peninsula, hang two or three pendant lights at the correct height (typically 30-36 inches above the countertop) to define the space.
Step 4: Incorporate Reflective Materials and Surfaces
As you update finishes, choose options that enhance light. Install a glossy tile backsplash. If replacing countertops isn’t in the budget, a light-colored, high-gloss laminate can work wonders. Update cabinet hardware to polished metal. These elements act as mirrors for your new lighting scheme.
Step 5: Add Accent Lighting and Reflective Decor
Now, add the polish. Consider battery-operated puck lights inside open shelving or a cabinet with glass doors. Install subtle toe-kick lighting for a floating effect. Place a large mirror on a wall to capture and redirect light from windows or fixtures. This step adds depth and a high-end touch to your manufactured home kitchen update.
Step 6: Style with Light, Airy Accessories
Finally, decorate with intention. Choose window treatments that allow light to pass through, like Roman shades or sheer curtains. Select a light-colored rug to brighten the floor. Keep countertops clutter-free but styled with a few decorative items in glass, metal, or white ceramic to maintain the bright, open feeling.
Elevating the Look: Advanced Styling Tips
To truly perfect your bright single-wide kitchen redesign, consider these advanced touches. First, install dimmer switches on all your primary light fixtures. This allows you to control the intensity and mood instantly, from a bright workspace for cooking to a soft glow for dining. Second, pay attention to bulb temperature. Use cooler, brighter whites (3500K-4000K) for task areas and warmer whites (2700K-3000K) for ambient and accent lights to create a balanced, inviting atmosphere.
Introduce a single, unexpected textural element to prevent the space from feeling sterile. This could be a woven light fixture, a wooden cutting board on display, or a textured runner rug. Furthermore, use artwork strategically. A large, framed piece with a white mat can act as a secondary light source and focal point. Finally, don’t forget the ceiling—painting it a bright white or even installing a subtle, luminous ceiling tile can amplify light distribution dramatically. These nuanced details will make your trailer kitchen remodel single wide feel professionally designed and uniquely yours.
Maintenance & Care: Keeping Your Space Fresh
Maintaining the bright, new look of your mobile home kitchen is straightforward. Regularly dust light fixtures and bulbs to ensure maximum output; dirty bulbs can lose up to 50% of their luminosity. Wipe down reflective surfaces like backsplashes, stainless steel appliances, and hardware with appropriate cleaners (like vinegar solutions for glass or manufacturer-recommended products for metals) to keep them sparkling.
For painted cabinets and walls, use a gentle, non-abrasive cleaner to touch up smudges. Periodically check your LED light strips or under-cabinet lights to replace any failing segments. To keep the space feeling fresh, you can easily update the look seasonally by switching out accessories like towels, a runner rug, or a countertop plant—this allows you to play with color without compromising the bright foundation of your successful single-wide kitchen overhaul.
FAQs: Frequently Asked Questions About Mobile Home Kitchen Remodeling
Q: How can I make my single-wide trailer kitchen look bigger without knocking down walls?
A: The most effective strategy is a combination of bright, layered lighting and a light, monochromatic color palette. Using reflective surfaces (glossy backsplashes, mirrors) and ensuring ample task lighting eliminates dark, shadowy corners that make a space feel small. Choosing furniture and decor with legs (like bar stools) also promotes a sense of airiness.
Q: What is the best type of lighting for a small mobile home kitchen?
A: A layered approach is best. Start with efficient ambient lighting (like recessed LEDs), add crucial under-cabinet task lighting, and finish with accent lighting. LED strips are ideal for small spaces as they are slim, energy-efficient, and provide even, shadow-free light on countertops.
Q: I’m on a very tight budget. What is the single most impactful change I can make?
A: Without a doubt, updating your lighting. Replacing old, dim fixtures with bright LED alternatives and adding affordable adhesive LED strips under your cabinets will transform the functionality and feel of the space more than any other single update. Painting cabinets a light color is a very close second for impact-per-dollar.
Q: Can I really install a pendant light in my mobile home kitchen?
A: Absolutely! Many mobile homes have standard ceiling electrical boxes. You can install a pendant light just as you would in a site-built home. If you’re unsure about electrical work, always consult or hire a qualified electrician, especially one familiar with manufactured home systems.
Q: How do I choose a paint color that will make my kitchen look brighter?
A: Opt for paints with a Light Reflective Value (LRV) of 70 or higher. These are typically whites and very light neutrals. Also, choose a paint finish with some sheen (e.g., satin or semi-gloss) for walls and cabinets, as it reflects more light than a flat matte finish and is easier to clean.